
Hi! Welcome back to my Aurora Designs Jewelry’s blog post! It’s been a while…no excuses for the long absence, just didn’t do it. BUT, Brenda Lansdowne from http://www.bsueboutiques.com, challenged us again, and who can resist that cute face when she issues a challenge! So, here I am participating in the “Change It Up” Blog Hop. We were tasked to choose one of the pieces in the photo below, from http://www.bsueboutiques.com, and make it into something unrecognizable from the original piece. I want to share my journey and my processes through a pictorial journal. Please follow along with me on my journey to my finished piece and see how I “Changed It Up”.
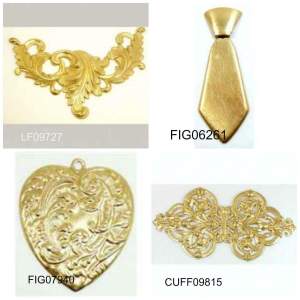
These are the four pieces from http://www.bsueboutiques.com from which we had to choose.
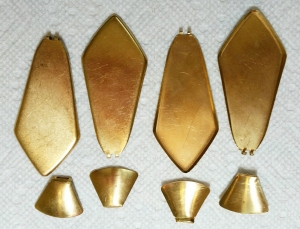
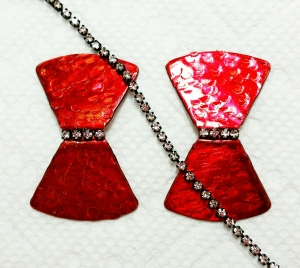
This is how I started to “change it up”. I separated each necktie and cut off the small tabs that connected them.
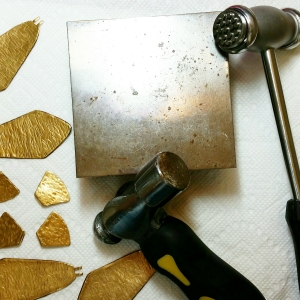
I added some texture to each piece with my texturing hammer, for cool interest. I wanted it to show well after I colored the pieces.
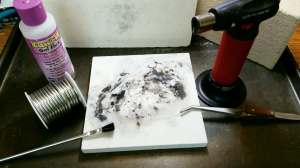
Soldering station set up and ready to solder some of the pieces. I hadn’t soldered in quite a while, so I just went with what I remembered from the class I took a long time ago.
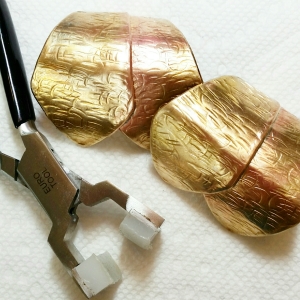
Needed to do a bit of bending and forming to get the shape I want with a bracelet bending pliers, my husband’s vise, and some brute strength.
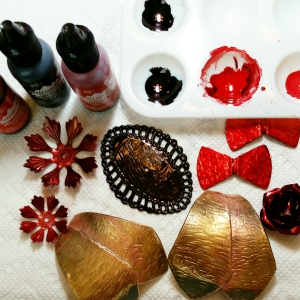
Picked some B’sue focal pieces from my stash and added some color with alcohol inks. Can you see where I’m going yet?
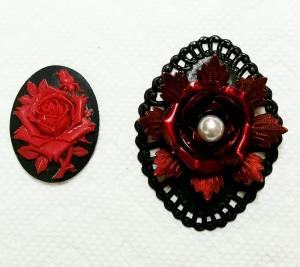
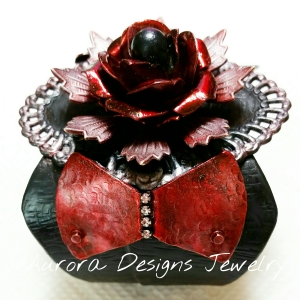
Cold connected the focal pieces with a screw, washer, and nut, and realized it looked similar to a red and black cabachon from B’sue’s supply website.
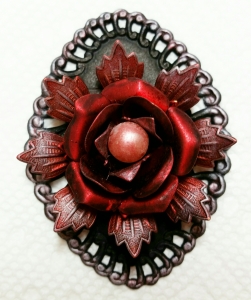
I decided it needed a touch of PearlEx powder here and there. I glued the pearl into the center and put some red Perfect Pearls on it, then sealed the whole thing. Wasn’t crazy about the red pearl, so…I “changed it up”. You’ll see it in the final photo.
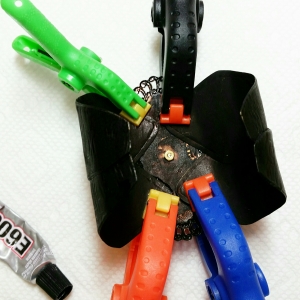
After painting and sealing the sides, it was time to connect the focal to the the sides. Some gluing and clamping works for that. Now it sets for twenty-four hours.
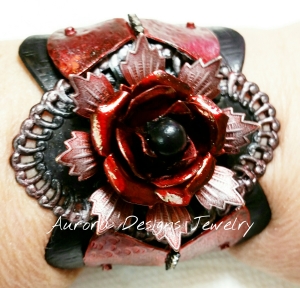
After waiting for twenty four hours for the glue to set, I took the clamps off and when I was making an adjustment to one of the sides, it came off!! I was not worried. I just decided to cold connect the cuff sides to the center focal. Took it apart and started cold connecting. When I finished that process, I repainted the whole thing, and sealed it. Now I present to you, my Change It Up, Vintage Flair Gothic Cuff.
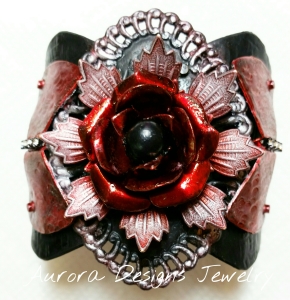
Matte black and Glossy red with a black pearl center and rhinestone cup chain accent. Pearl Ex powder on the focal swirled edges and the outside flower petals.
Before I started my Challenge piece, I decided that I would not start another new piece until I had cleaned up EVERY half finished piece at all three stations on my large kitchen table, so away I went, working five to six hours a day, non stop. I was inspired by my friend Jann Tague of Clever Designs, when she was here for a play date a couple weeks ago (we played with resin that day, and I made a bunch of cabachons in my mold), and she started digging (literally), through my stuff on the table. She kindly sorted out a bunch of things for me, and point blank told me to “git ‘er done!” So I began working on all the things on my table. Many only needed chains/neck treatment to be finished. (I have a hard time with that sometimes.) Then, I posted them on our B’sue Boutiques Creative Group Page last Friday and Saturday for FUF (Finished Up Friday). It felt SOOOOOO good to have finished about half of what was on my work table. Here are photos of some of the finished pieces and my Work Table photo for this past Wednesday’s WTW (Work Table Wednesday). Once I finish what is on there, I will have fewer than ten pieces left to finish. Then, I can start my FALL Themed pieces!
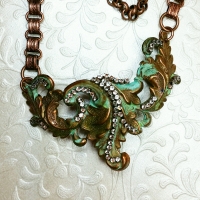
This altered piece had been on my work table for over a year. Rhinestone chain accent and book chain finished it.
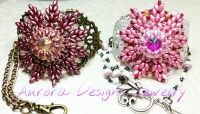
I beaded the focal pieces and couched them onto altered pieces from b’sueboutiques, and added some chain to complete the cuff.

One of the resin cabachons that I colored with Perfect Pearls and Mica Chips, them made into a pretty brooch.
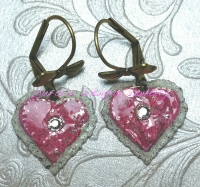
Iced Enamel and Ice Resin small heart earrings with a crystal accent, and bow lever backs ear wires.

This is what I have left to finish on my work table. I will have them finished by the end of next week. I can see the light at the end of the tunnel, now. WOOHOO!!
I hope you’ve enjoyed reading my blog post and following along in my process for “CHANGING IT UP”, and seeing some of my creations. I love working in mixed media and love being in such a loving, supportive, encouraging group of people. Brenda Sue Landsdowne is an awesome mentor, and she has the absolute BEST supplies and perks on her website, http://www.bsueboutiques.com. I hope you’ll check out her site and while you’re there, be sure to click on the Design Team page and read about my journey. Thanks for reading, and I will be ever so appreciative if you will leave a kind comment and share and like my blog post.
The list of participants is below and they all have made some amazing creations. To join the Hop, just click on the next name’s url below mine, and away you go. Please leave them a kind comment, too. I know they’ll appreciate it!!
Brenda Sue Lansdowne
Jewelry Making Outside the Box
Mary Deis
The Rose Sword
http://theroseswordmdeis.blogspot.com/
Jann Tague
Clever Designs
https://janntague.wordpress.com/
Lori Beekman
B.Accessorized
https://baccessorized.wordpress.com/
Renee Hong
Fine and Dandy Jewelry
http://www.fineanddandyjewelry.blogspot.com/
Cynthia Wainscott
Exotic Peru Jewelry
http://exoticperujewelry.blogspot.com/
Dana Hickey
Magpie Approved
http://magpieapproved.blogspot.com/
Mary Beth Quigley-Spiker
Q Settings
https://qsettings.wordpress.com/
Karen Eaton
KJewelry Creations
http://kjewelrycreations1.blogspot.com/
Shari Gardner
SLG Jewelry Designs
https://slgdesigns.wordpress.com/
Alison Huie
Ally’s Baubles
http://allysbaubles.blogspot.com/
Pamela Anger
Novegatti Designs
http://www.novegattidesigns.blogspot.com/
Carole Carlson
Beadsophisticate
https://beadsophisticate.wordpress.com/
Cindy Peterson
Howling Dog Jewelry
https://howlingdogjewelry.wordpress.com/
Marcia Tuzzolino
Aurora Designs
http://auroradesignsjewelryblog.me/
Charlotte Smothers
Sea Horse Ranch Life
http://seahorseranch.blogspot.com/
Catherine Shattuck
Victorian Rose Boutique
https://vrbrose.wordpress.com/
Clare Wells Nemeth
Papercrafting Magic
http://papercraftingmagic.blogspot.com/
Erin Whitacre
Shattered Time
https://shatteredtimejewelry.wordpress.com/
Lynda O’Mara
Lomara Creative
http://www.lomaracreative.com/
Ginger Hammond
Lynn Leigh Designs
https://lynnleighdesigns.wordpress.com/
Ingrid Anderson
Lilis Gems Artisan Jewelry
https://lilisgems.wordpress.com/
Deb Beechy
Beetique
http://www.beetique56.blogspot.com
Harry Wood
Oscar Crow
http://oscarcrow.blogspot.com/
Delyssa Maxwell
Past Time Fancies
https://pasttimefancies.wordpress.com/
Paula Gaskill
Lovely Layla Bugs
http://lovelylaylabugjewels.weebly.com/blog
Irene Hoffman
Heart’s Dezire by Irene
https://heartsdezirebyirene.wordpress.com/
Alexandra Sefton
Imaginary Jewelry and Altered Art
http://wilywolverine.blogspot.com/
Leslie Carver
Adorn Divine Designs


what A beautiful blog!
LikeLiked by 1 person
Thanks so much, Donna! Looking forward to Friday!
LikeLike
What A beautiful blog! I will look forward to returning and enjoying your next post!
LikeLiked by 1 person
Thank you, Donna!
LikeLike
Magical!!! I love what you have done! So creative!! Enjoyed!
LikeLiked by 1 person
Thanks so much, Nike!!
LikeLike
Wow, Marcia, you really did change it up and what a marvelous design it is! The bracelet turned out wonderfully, the colors are great, and you did a great job of hitting the challenge right on!
– Pamela
LikeLiked by 1 person
Thank you, Pamela, for your wonderful comments!!
LikeLike
WOWZA, Marcia!! This is amazing!! Have to admit that I’m jealous of all those tools you have at your disposal. 😉👍💕
LikeLiked by 1 person
Thanks so much, Catherine!! Every time I learned something new, had to have all the tools to go with what I learned!! lol
LikeLike
WOW! Unique, Creative, Amazing cuff, thinking outside the box in a big way! Love this idea and design and you truly changed it up
LikeLiked by 1 person
Thanks so much, Cindy. Appreciate the comments!
LikeLike
Out of the box, here come the scissors and then the hammer! You are my kind of gal! Very nice indeed!
LikeLiked by 1 person
Thanks so much, Kate!! Hope you’re doing well.
LikeLike
This is a beautiful cuff love the colors!
LikeLiked by 1 person
Thank you!!
LikeLike
Marcia–great idea to cut the tie apart and use it the way you did to make such a unique bracelet. Congratulations on getting all your other pieces done. Thanks for showing them. Great job!
LikeLiked by 1 person
Not only do I love what you did with the cuff, but also the patina swag necklace at the end, and the brooch! I love the mint green floral brooch! What you did with that tie stamping is really different. The texture is great, the colors, and I like how you kept going and “changed it up” when something didn’t do what you wanted it to. How nice of Jann to help you sort out your work table. You’ve got some awesome things to work on!
LikeLiked by 1 person
Thanks SO, much!!
LikeLike
A very creative design Marcia! Lovely cuff!
LikeLiked by 1 person
Thanks so much, Beth!!
LikeLike
You outdid yourself on this one Marcia and definitely changed it up. How clever of you to form the bowties into a cuff. You were definitely thinking outside the box on this one. Very well done and beautiful my friend.
LikeLiked by 1 person
Thanks so much, my dear friend!
LikeLike
Marcia I just think this change up was brilliant! You made such a cohesive new piece. Simply gorgeous!
LikeLiked by 1 person
Thanks so much, Sue, for your wonderful comment!!
LikeLike
This is the most dramatic “change it up” piece I have seen! You did a spectacular design; truly this embodies the challenge. I love everything, every detail is perfect. Quoting Judy Jetson – “This is the most ut!”
LikeLiked by 1 person
Thanks, Chi, for your awesome comments!! Love the quote!!
LikeLike
So dramatic and beautiful, that red and black color scheme. It is encouraging to read how you persevered over the little bumps along the way.
LikeLiked by 1 person
Thank you, Charlotte!!
LikeLike
Over the top beautiful .. so creative dear friend .. I love everything on this cuff
LikeLiked by 1 person
Thanks so much, my sweet friend!!
LikeLike
Very pretty and original. Hard to believe it was the ties.
LikeLiked by 1 person
Thank you, Shari!!
LikeLike
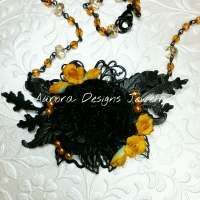
Great hearing about your steps to making this beauty! Love the gothic flair and the tie pieces on the sides with cup chain! On the black and gold piece, how did you attach the black flatback resin flower to the raised metal part? 🙂
LikeLiked by 1 person
Thanks so much, Alexandra!!
I glued it (E6000) to the back base and clamped the resin flower.
LikeLike
Wow! I am totally blown away. Never in a million years would I have thought to use that tie like that. And the colors! So so beautiful. You came out of this challenge with flying colors Marcia. Great job!
LikeLiked by 1 person
What wonderful comments! Thank you, Marica!!
LikeLike
Now that’s how you change it up! I would never have known it started out as the tie! Love the color combo too, really pretty!
LikeLiked by 1 person
Thanks much, Dana!
LikeLike
you really left the form on this one. Very wild.
LikeLiked by 1 person
Thanks so much, Harry!!
LikeLike
I love what you did here Marcia. Excellant job
LikeLiked by 1 person
Thanks much, Lois!!
LikeLike
Very unique and wow what THOUGHT you put into your design. I am duly impressed, that’s for sure. Great looking piece!
LikeLiked by 1 person
Thanks SO much, Brenda! I loved making this piece and it turned out even better than what I had pictured in my head!!
LikeLike
Gorgeous cuff Marcia, I love how you changed those ties, that was genius! I also have a gazillion projects on my table and it is so overwhelming. But reading your blog made a big impression on me to get in there and finish one at a time. So yours is my first reading of the morning, and it has put a smile on my face. I love your style of jewelry, your creativity is off the charts! 😀
LikeLiked by 1 person
Awww, thank you SO much, Belinda, for your sweet comments. Happy that I made you smile…right back at you!
LikeLike
Marcia, oh my stars and stripes! You took this challenge to a whole new level. First, thanks for sharing the photos of the process you used…Brilliant! Second, I appreciate seeing the piece through your eyes as it developed. Third, you and Jann hop on a plane and help me finish up my projects!!! I’m not typically a fan of red and black, but the silver frosting pulled it all together for me. What a wonderful outcome. Love it!
LikeLiked by 2 people
Thank you, SO much, dear Susan! I would love to come help you with Jann!! We’d have a blast!
LikeLike
I love your bracelet. Very creative my friend. Looks like I need a pal like Jann to get me motivated also!
LikeLiked by 1 person
Thanks so much, Debbie!! I had this design in mind before Jann kicked me in the you know where! lol
LikeLike
Holy buckets! That cuff is amazing. Wow. Your pieces are always lovely. ❤
LikeLiked by 1 person
Thank you, Lori, for your wonderful comments!!
LikeLike
I absolutely love the cuff. Never would of thought of using the tie like that. So creative and I love black and red. I like the rivets as they give it an industrial romantic feel! LOVE it!!!!!!! Ingrid
LikeLiked by 1 person
Thanks so much, Ingrid!!
LikeLike
You saw a wonderful way, to go outside the box on this stamping. I would have never seen that. I am amazed. JUST STUNNING!
LikeLiked by 1 person
Thanks for your uplifting comments, Mary-Beth!!
LikeLiked by 1 person
WOW ..Great job hiding that piece in your work….
LikeLiked by 1 person
Thank you, Pat!!
LikeLike
Great design and use of the tie!!! The colors are wonderful together too!! Hoppin’ on……..
LikeLiked by 1 person
Thank you so much, Karen!!
LikeLike
Marcia how clever you are! I loved what you did with the ties, In a million years I would have thought of that 😉 genius!!
LikeLiked by 1 person
Thank you, Cynthia. It was so fun to transform the ties.
LikeLike
Marcia, as soon as I saw that tie piece was going to be in the choices for the challenge I wondered, “What would happen if you cut the pieces apart?” I couldn’t have brought myself to actually do it, but boy did you do an incredible job with it. I especially loved the red with the bling. I’d love to see that part made up into it’s own design. This cuff is great, thanks for sharing your process.
LikeLiked by 1 person
Thanks so much for your wonderful comments, Teresa!!
LikeLike
That’s quite a cuff, Marcia! Your imagination took you to beautiful places :-). And you can never go wrong with a texturing hammer! Lovely!!
LikeLiked by 1 person
Thanks so much, Lori!
LikeLike
Nice design for sure. Very creative way of thinking outside the box.
LikeLiked by 1 person
Thank you, Paula!
LikeLike